Monday 25 November 2013

Building a pirate ship tutorial

Ahoy, me Hearties!  Avast ye.

Pirate Parrot PJ and his new pirate ship

What a gorgeous day it has been today. Hot though.  Thinking we are in for a very long and very hot summer.  Weird, as we had a really warm end of winter. Nice though.  It's Tuesday evening, November 25, 2013, home from work, and now time for play.

Well, Parrot PJ's pirate ship has been on my mind, and so construction has begun.  Thought I would keep a record of the steps, to make it easy for next time and of course, for you to create your own one.  
I was so impressed with the ship that is shown on Molly Moo's site, that I have used that pattern template - to begin with.  Thank you very much Molly Moo.  Am sure as this one evolves, there will be some differences.  That is why I love working with cardboard, sometimes things just develop as they go along.


Oh, and listen to that PJ parrot, prattle on....   He certainly does like to have his say... apologies there
Ahoy, me Hearties.  Is pirate parrot talk, for hello my friends.
Avast ye...   that means  stop and check this out - or -  pay attention.  .


So, down to business....   

When working with cardboard, where possible lay your pattern on the long groove runs that you see in the cardboard.  This give greater strength.

Basic Items required
Cardboard box
Good cutting knife 
- check out a Fiskars finger knife. Brilliant
Paper mache  
- paper and paste  or gummed paper
PVA Glue
Paint
Dowel or chopstick for masts
Cloth for sails

Ship pattern on cardboard for cutting

Step 1
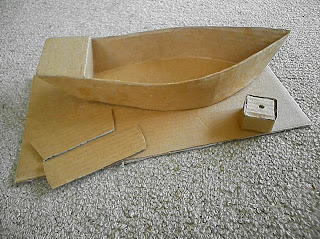
Cut out the basic ship pieces.  Leave the seats until later, after basic construction complete, to get best size fit.  Photo time...
Cardboard cut out.  Carpet survives... only just

Hull now constructed.


Step 2.  Tape the sides to the base.  Gently ease in the curve of the ship sides.  Attach the stern. (Nautical term, the stern, or the back of the ship). 
I then cut a piece to cover the stern area, along with a second one, for good reinforcement, and a further one to close it in. I have seen some boats that managed to use this stern area, as a little storage area... may do that on my next one.


 Step 3.  Having covered in the ship's hull, and closed in the stern area, with my favourite new 'easy way' by using gummed tape.  It does not have a shiny surface, it looks exactly like the cardboard.  Easy to paint over.  Paper mache is the other method. I frequently use the paper mache method, but for thisproject I went with the gummed tape.  Gives the same good strength to the ship, as paper mache would do.

I was then able to measure the 2 seats, and I made a little box with a strip of cardboard and put about 12 squares of cardboard glued together, as a support for the mast.  

Before gluing together, I used my knife to begin a hole for the mast, by going all the way through to the bottom square.  Glued, left to dry. This will sit, under the middle of the first seat toward the bow - the front part of a ship (pronounced like bough or cow - not the tie a bow in my hair... lol) - 
You can see below, the approximate area that I am going to put the support for the mast. The next picture, you can just see it peeping out.


These two pics, give an indication of the size of the ship.  I have shown the sizes, length, width and height of the ship, with the pen there for added size appreciation.  I think it is a really good size.  Not too big, not to small and fiddly.


So, construction is well under way.  Wont be getting much done on the ship tonight, as the blog has taken up a fair bit of time.  New to blogging, so more new learning...  ahhh never a dull moment....


Do hope the details given above will give you an insight into the construction, and get you enthused, to get on with making one yourself.  

This one is for the little boy that I made the Pirate Collection for, and I also have to get busy, as I am making a further 6 sets, to go under the christmas tree at our local children's hospital.  Busy times... but great fun.  I know I get so much fun out of creating and making all these different pirate goodies.  Just love it.  No two items ever come out quite the same.

Further steps in this tutorial will follow in the next day or so.

So, from PJ parrot...  and myself, see you all soon, and look forward to your comments.
Saturday 23 November 2013

Make all things PIRATE. Treasure chest, outfit, and a little Piratey friend.

Arrrrrrgh, morning all...

Sunday November 24, 2014

Pirate Parrot PJ 

just had to pop in and say hello to all...

Don't you just love him.
He is part of the Pirate Collection of toys and clothes created over the past couple of weeks for a little 5 year old...

So when a work mate mentioned his young 5 year old was 'into all things Pirate" I just had to get creative, and, without him knowing, I made these goodies for his little boy.  I gave it to him at work on Thursday.  He was over the moon.

Having been inspired by many of you who have created such wonderful play items for your kiddies, I just fell in love with all things pirate, that so many of you had created.

Time now to share by way of a blog, so that I can acknowledge those who originally shared their original creations - and - to also inspire others, who too, may go looking for ideas.  I  am new to this type of post, so please bear with me, and any suggestions, will be greatly received.

The collection began with a Pirate Treasure Chest and spyglass.  A pirate hat and gold coin loot was required.  So to a treasure map and message bottle.  A belt, or two.  
The basic for any good Pirate
Working with cardboard for the treasure chest, spy glass (and the pirate ship - currently under construction) is a lot of fun.  Little bit of paper mache smooths off the edges.

The basics any good Pirate should have  - spot the keys for the Treasure Chest

 Soooo, fell in love with this style of Treasure Chest, which I found at How to be a bad artist.  She has some lovely crafts and a great tutorial on this type of treasure chest, along with other great crafty ideas.  the treasure chest .  Great instructions, and I will do a tutorial myself, to cover the in's and out's I found out about, when creating this lovely item.

 Treasure chest n spy glass for Pirate adventures

More paper mache work, on the coins.  
Loot collected on Pirate adventures
 Working with cardboard is just one of the most satisfying of the activities I do. It begins as a used cardboard box, then slowly it begins to take on a life of it's own.  You can't do anything 'wrong' and the paper mache added, sorts out and covers any 'blimps'.  Before long, yeah, you have created a whole new thing.  

Then the delight of painting it.  Again the painting another brilliant way to cover any defects... 

However, in my view with a pirate item, there are no glitches or boo-boos, as they all add to the aged and piratey effect, giving realism.  This is how I see it - adding character.


2 belts and 2 loots bags when a a visiting pirate comes to play


The keys  - to open the Treasure Chest - when found
Having had so much fun making all the various Pirate items, I had completely overlooked the actual Pirate outfit.  Oooops.   Think this pirate better have an actual outfit, so the vest, and  pants began. Off to the cutting table and sewing machine.  

I found this great idea for the Pirate shirt from ( I need to go find the site and and add it in), and adpated it slightly.  All in one piece shirt.

And my PJ Parrot  -  PJ is short for   -  Pirate Jack, the name of the little boy, these gifts were made for.  I found details to do this parrot here at the "crafts for kids to make" site.
Suddenly it has all come together.  My job was done.

All ready to be packed up and off to one 5 year old Pirate to be....

Well that is what I thought....  Does a pirate not need a Pirate Ship.  Oh yes they do.... so, that is currently under construction.   More to come...